Showing posts with label Veggie Recipes. Show all posts

Sunday, January 18, 2015

Herbed Spaghetti Squash

I've never had spaghetti squash before. It  was actually pretty good! I tossed it in a homemade pesto made of parsley. It was a great way to eat a new veggie, and was flavorful and healthy! You know it's January and most are watching their weight. So I encourage you to give this recipe a try!

Note: be careful cutting the squash. It's pretty tough cutting down the middle from the top. I found it easier to stab it in the middle of the squash and try cutting it in half that way. Also helps to call over your strong husband to help cut it 😉

Herbed Spaghetti Squash

Ingredients:
1 med spaghetti squash
1 lg garlic clove
1/4 c pecan
1/2 bunch parsley
1/4 c olive oil, plus more for drizzling 
1/4 c San Pietro-Honeywax cheese, grated (or Asiago)
1 1/2 tsp lime juice
1/2 tsp salt
Salt and pepper for seasoning 

Preheat the oven to 375 degrees F. 
Carefully cut the spaghetti squash in half. Scoop out the seeds and discard. Place aluminum foil on a baking sheet. Drizzle the cut sides of the squash with olive oil, salt, and pepper. Then place the spaghetti squash cut side down on the baking sheet. 
Cut the top off of the garlic clove. Place the clove in aluminum foil. Drizzle the cut clove with olive oil, salt, and pepper. Gather the foil together and place on the baking sheet with the squash. Bake for about 35-40 mins until tender. Let it cool enough until ready to handle. Taking a fork, scoop out the flesh of the squash into a bowl. It should resemble spaghetti strands. 
To make the pesto: In a food processor, squeeze the roasted garlic cloves into the bowl. Add the pecan, parsley, and 1/2 tsp salt. Process until chopped, then slowly add the 1/4 c olive oil. Mix in the cheese and lime juice. Toss the pesto with the spaghetti squash. Season with salt and pepper if needed. Enjoy!

Sunday, June 1, 2014

Golden Chanterelle Gnocchi


If you ever come across golden chanterelle mushroom, you must try them. Matt's coworker introduced us to these mushroom. His coworker found a ton on his hike and was nice enough to give us a couple bags. The mushrooms are meaty and very earthy. It adds a lot of flavor to this pasta dish. We really enjoyed them and are sad we don't see them at the stores around here. 


Golden Chanterelle Gnocchi

2 tbsp butter
2 c golden chanterelle mushroom
2 tbsp flour
1 pint heavy cream
2 c morel and leek cheese, shredded
1 lb gnocchi, cooked
Salt and pepper
Chopped parsley

Heat the butter over medium-high heat. Add the mushrooms and cook for about 5 mins. Add the flour and cook for a couple of mins to cook out the flour taste. Slowly whisk in the cream. Bring to a simmer. Slowly add the cheese, a little at a time so it can all incorporate. Cook over medium-low heat until thickened. Salt and pepper to taste. Stir in the gnocchi and finish with some chopped parsley. 

For the gnocchi, I tried Marc Forgione's Gnocchi recipe in Food Network Magazine's April 2012 Gnocchi with Brown Butter and Sage. It was really easy. And I was able to freeze the rest and cook it up real nicely. It wasn't gummy like another gnocchi recipe I tried. Below is the gnocchi recipe I used:
1. Preheat the oven to 375 degrees F. Pour a mound of kosher salt onto a rimmed baking sheet. Prick 3 large russet potatoes (1 1/2 to 1 3/4 lbs) all over with a fork and nestle them in the salt; this prevents the potatoes from browning and draws out their moisture. Bake the potatoes until fork-tender, about 45 mins. Let sit until just cool enough to handle. 
2. Halve the potatoes lengthwise and scoop the flesh into a bowl; discard the skin. Break the flesh with a fork. Put into a floured cutting board. Let cool 3-4 mins. Spread out the potatoes slightly. Beat 1 large egg with 1/2 tsp salt in a small bowl and drizzle over the potatoes. Sprinkle the potatoes mixture with 1 c flour and knead until a smooth dough forms, adding up to 1/2 c more flour if the dough is sticky. When you press your finger into the dough it should come out clean. If it doesn't, continue to knead. Cover with a kitchen towel and let rest 10 mins. 
3. Lightly flour your surface. Divide the dough into 6 pieces and roll into "snakes," about 1/2 inch in diameter. Cut into 1/2-to-1-inch lengths with a knife; transfer to a parchment-lined baking sheet and lightly dust with flour. 
You can transfer to a gallon sized bag and freeze any gnocchi you won't be cooking right away. 
4. Bring a large pot of salted water to a boil. Add the gnocchi; wait until they float to the surface, then simmer 30 more seconds. Scoop the gnocchi from the pot with a spider or slotted spoon.


Saturday, January 25, 2014

Chipotle Chicken Salad

Whipped up some chicken salad with the chicken tenders, celery, and lettuce we had. The result ended up being blog-worthy. It had a nice bit of kick to it from the chipotle chile pepper and lots of flavor from the other spices making this salad a keeper. And it was so easy and quick to put together. I had to blog it to remember what all I threw together. 

Chipotle Chicken Salad

6 chicken tender
1 bay leaf
6 sprig thyme
1 sprig rosemary
1 clove garlic, smashed and halved
1 tsp Kosher salt
Grinds of Grains of paradise or black pepper

Put all contents in a medium saucepan. Cover with water. Bring to a boil over medium-high heat. Transfer cooked chicken to a cutting board and let it cool. 

To prepare the rest of the chicken salad, mix together in a medium bowl:
2 celery stalks, chopped
1 tbsp parsley, chopped
4 tsp capers, chopped, plus 1 tsp brine
1 tsp lemon juice
1 1/2 tsp Worcestershire sauce
1 tsp Dijon mustard
2 lg spoonful mayo
1/2 tsp garlic powder
1/2 tsp onion powder
1/2 tsp smoked paprika
1/4 tsp chipotle chile pepper
Pinch of salt and pepper

Dice the cooked chicken and toss with the contents of the bowl. Serve over mixed greens and with some mozzarella. 

Sunday, October 27, 2013

Roasted Sweet Potato and Sprout

Now don't turn away when you see that brussel sprouts are in here! I think these little guys get a bad reputation. My friend, who doesn't like brussel sprouts, decided to give them a try when we were out at dinner one day. I tried one and told her no wonder they get a bad rep! It was barely cooked nor seasoned. 
My favorite way to have brussel sprouts is roasted in the oven with some olive oil, salt and pepper, until fork-tender. For this dish, I also threw in some sweet potato and tomatoes we had in the fridge. All the colors were beautiful together. It made a nice presentation. I was thinking it could even be a great veggie dish for Thanksgiving!

Roasted Sweet Potato and Sprouts
1 large sweet potato, peeled and diced into small cubes
1 bag of brussel sprouts, halved
1 c grape tomatoes, halved
1/4 c fresh oregano leaves, chopped
1 tsp thyme leaves
2 roasted garlic cloves, chopped 
4 slices of bacon, sliced 
Salt and pepper (about 1 tsp)
Olive oil (about a qtr to half a cup)
2 tbsp butter, cut into small pats

Preheat the oven to 425 degrees F. In a large casserole dish, add the potatoes, sprouts, tomatoes, bacon, oregano, thyme, and garlic. Season generously with salt and pepper. Drizzle with olive oil and toss to coat. Top with the butter and roast in the oven for about 30-45 mins, until it's fork-tender. 

Monday, May 13, 2013

Honeyed Citrus Vinegrette

Have you ever bought something for a recipe and never have to use it again? Of course we all have. Orange extract was one of those culprits in our pantry. We actually didn't even end up using it! Well I decided to open that little bottle up and incorporate it into a last-minute salad dressing. It turned out surprisingly well - so light and refreshing. I encourage you to give that extract bottle a chance outside of baking!

Honeyed Citrus Vinegrette

1/2 lemon, juiced
1/2 tsp oregano
1/2 tsp orange extract
1/2 c olive oil
1-2 tsp honey
3 sprig thyme leaves
Salt and pepper to taste 

Whisk everything together. Taste and adjust the flavors to your liking. 

Wednesday, March 6, 2013

Healthier Caesar Salad

If you're looking for a salad without all the oil, but still full of flavor, try this salad! I took some spring mix salad, added a couple of chopped anchovies, capers, parmesan, croutons, and a poached egg. The salad was quite tasty!
I had ran out of olive oil to make caesar dressing. So that's why I decided to try adding a poached egg instead of having plain lettuce with anchovies. I guess you can say this is a deconstructed caesar salad?

Sunday, January 27, 2013

Roasted Artichoke with Herb Yogurt Dip

This yogurt dip was delicious! I couldn't get enough of it. Very light, refreshing and better for you than most dips!

Roasted Artichoke with Herb Yogurt Dip

1 12 oz bag frozen artichoke hearts
1/2 c nonfat, plain Greek yogurt
1/4 c sour cream
2 tsp thyme
2 tsp chives, chopped
2 tsp parsley, chopped
1 tsp garlic powder
Salt and pepper
Olive oil

Preheat the oven to 350 degrees F. Toss the artichoke with some salt, pepper, and olive oil. Spread in a single layer on a baking sheet and roast for about 30-40 mins.
Meanwhile, mix the yogurt, sour cream, thyme, chives, parsley, and garlic powder together. Salt and pepper to taste. Chill until ready to eat. Serve with the roasted artichoke hearts.


Saturday, November 3, 2012

Cod Fillet Sandwich with Cilantro Cabbage Slaw

I was going for a light fish sandwich. The store didn't have mahi-mahi like I wanted, so I decided to try the cod. It worked and tasted good, but the cod fillet didn't hold up as well as mahi-mahi could have. The fillet broke apart so I ended up stacking pieces of fish onto the sandwich. But you can try out any other white fish you'd like.

The star of this dish was the slaw. It was so light and refreshing. The Greek yogurt added tang to the slaw, and the cilantro added the flavor. It can even be enjoyed as a side dish.

Cod Fillet Sandwich - with Cilantro Cabbage Slaw

Ingredients

4 cod fillet (or any white fish)
4 buns
1 small savoy cabbage, sliced
1/2 c cilantro, chopped
1/2 lime, juiced
1 c nonfat, plain Greek yogurt
4 tbsp mayo
1/2 tsp garlic powder
1/2 tsp seasoned salt
salt and pepper
butter or olive oil

1. Prepare the slaw: Mix the cabbage, cilantro, lime juice, Greek yogurt, mayo, garlic powder, seasoned salt, 1 tsp salt, and 1/2 tsp pepper together. Let it chill in the fridge while you prepare the fish. (That way the flavors can develop as well.)

2. Prepare the fish: Season both sides of the fish with salt and pepper. In a skillet over medium heat, add olive oil. Cook the fish about 3-5 mins on each side.

3. Assemble: Butter and toast the buns. Then top with a fish fillet and some slaw. Enjoy!


Thursday, July 19, 2012

Crispy Zucchini Fries

These zucchini fries are super crispy. And all the flavors in the crispy coating eliminates the need for a dipping sauce.You could make this even healthier by baking them instead of frying. Just spray a cookie sheet with non-stick cooking spray, lay the coated zucchini fries out in a single layer, spray the fries with non-stick cooking spray and bake at 350 degrees F until golden brown.

If you ever make zucchini fries, do not, I repeat DO NOT use a wet batter! All that moisture from the wet batter and zucchini will just cause your oil to bubble up and over, and create a disaster. I might be talking from experience here *ahem*...


Crispy Zucchini Fries

Ingredients
1 large zucchini
1 c. flour
2 eggs
1 c. panko
1 t. Italian seasoning
1/2 t. onion powder
1/2 t. chili powder
1/2 t. smoked paprika
1/8 t. cayenne pepper
1/2 t. salt
1/2 t. pepper
1 lemon
oil for frying

1. Prepare the zucchini: Slice your zucchini in half. Then slice the zucchini lengthwise into about 1/4 inch thick strips. Then cut into fries.

2. Prepare your workstation: In one bowl, add the flour. In another bowl, beat the eggs. In a third bowl, add the panko, Italian seasoning, onion powder, chili powder, paprika, cayenne, salt and pepper.

3. Working in batches, first dredge the zucchini fries in the flour. Shake off any excess flour and then dip in the egg wash, making sure the egg sticks to the flour-dredged zucchini fries. (This will ensure your panko coating sticks nicely.) Let the excess egg drip off. Then coat in the seasoned panko. (Press it into that panko coating if you have to. You want the fries nicely coated with the seasoned panko. This will give you your crispy zucchini fries.)

4. Fry for a few mins in 350 degrees F oil.  Transfer to a paper-towel-lined plate and sprinkle with more salt. Work on frying the rest of the batches. When ready to serve, squeeze lemon juice over the fries. The lemon ties it all together very nicely. Enjoy!


Tuesday, June 26, 2012

Collard Greens with Ox Tail

When Matt said "I enjoyed that more than I thought I would. You've got me liking all kinds of things now!" I knew I succeeded. See Matt can be a picky eater, so I'm always trying to challenge that.

These collard greens are so flavorful. And it's an extremely hearty dish. There are 2 secret ingredients that make this dish...

The first secret is the ox tail broth. You can get ox tail at any asian farmers market, like Super HMart. There's not much meat on ox tails, but the little bit that's there is juicy. It makes a delicious broth.

The second secret is the use of "nước mắm " or I should say "fish sauce". Now, don't get turned off. Fish sauce is commonly used in many of your asian dishes. This bottled sauce adds so much flavor to asian cuisine, and it really shows here.


Collard Greens with Ox Tail


nước mắm aka Fish Sauce

3 lbs Ox tails
3-4 qt water
1 bunch collard greens
4 tsp salt
6 tbsp fish sauce
1 tbsp hot sauce


Add water to a large stockpot and bring to a boil. Add the Ox tails. Bring to a boil again. Skim the fatty froth off the top layer and discard. Turn the heat to low and cover with a lid for 30 mins. Meanwhile remove the stems from the collard greens. Then slice the leaves, about 1 inch thick. Add the sliced collard green leaves, salt, fish sauce, and hot sauce to the broth. Simmer on medium to medium-low heat for 1 hr. Serve with more fish sauce and hot sauce to taste.

Thursday, June 14, 2012

Anniversary dinner: Veal, Risotto, and Truffles

When you cook every night, what do you do for a special occasion? Cook a very fancy, expensive meal! That's what I surprised my husband with on our 3rd wedding anniversary. This meal turned out perfect. If I had a restaurant, I would definitely serve this.

This veal dish is very similar to a Veal Marsala. Instead of using Marsala though, I used Cognac.It was a nice touch, not overpowering. The mushroom cognac sauce paired so well with the veal. And the risotto was so creamy and delicious. You really get that nice, fragrant mushroom aroma from the fresh summer truffles. We really, really loved this dish and I hope you will give it a try to see why...


Veal Scallopini with a Mushroom Cognac Sauce

4 veal scallopini
flour
1/2 c cognac
1 c beef stock
1 garlic clove, minced
1 pint bella or cremini mushrooms, sliced
2 tbsp butter
1 tbsp olive oil
salt and pepper


1. Lay the veal in saran wrap and gently pound the veal out a bit. Then lightly coat with some salt, pepper, and flour. In a deep skillet over medium high heat, add 1 tbsp butter and olive oil. Brown the veal, about 3 mins on each side. Transfer to a plate while you make your sauce.
2. Deglaze the pan with the cognac. Scape up the browned bits, and let the cognac reduce by half. Add the beef stock, garlic, and mushrooms. Let the sauce reduce by half. Finish with a tbsp of butter. Spoon the sauce over the veal and serve alongside these creamy risotto:


Risotto with Asparagus and Truffles

1 tbsp butter
1 tbsp olive oil
1/2 shallot, diced
1 1/2 c arborio rice
1/2 c white wine
6 c chicken broth
1 bunch asparagus
0.3 lb brie
3 whole black summer truffles (1.4 oz jar)

1. Prepare your asparagus: Snap off the lower woody ends of the asparagus and discard it. (It will naturally break where it should.) Then using a vegetable peeler, peel off the outer layer on the bottom of the asparagus. (If you've never peeled your asparagus stems, I encourage you to do so. Ever since I discovered the tender taste of peeled asparagus I haven't prepared my asparagus any other way.) Cut your asparagus into your desired bite size. (Mine was about an inch long.) Blanch the asparagus in gently boiling water for 1-2 mins. Drain in a colander and run cold water over them to stop the asparagus from cooking. Set aside.
2. In a small saucepan, heat up the chicken broth. When it's warmed, keep the broth over low heat.
3. In a large saucepan, heat the butter and olive oil over medium heat. Cook the shallots until translucent. Then add the rice and cook for a few mins. Add in the wine and cook until all the wine is absorbed. Then slowly add in a ladle of the warm chicken broth. Stir and cook until all the broth is absorbed. When the broth is absorbed, add another ladle of broth. Repeat process with the rest of the broth. (It will take about 30 mins.)
4. When you have a cup of broth left to add, go ahead and add your asparagus from earlier into the risotto. After all 6 cups of broth has been absorbed into the risotto, add 3/4 or all of the brie. (I, of course, added all the brie because we love cheese. But depending on your preference you can add as much as you'd like. I also tore the brie into smaller pieces to make incorporating easier.) Then with a microplane or grater, grate/slice the truffles into the risotto. Also add the truffle oil from the jar...you don't want to waste that flavor! Serve and enjoy your restaurant worthy meal at home.
Note: You can prepare your asparagus the day before like I did. Because the peeling can take some time and it was a workday, I wanted to prep the asparagus beforehand. And yes, do peel your asparagus. Even though it's time consuming it's very much worth it!
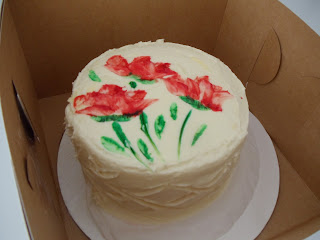

Matt surprised me with our wedding cake from Cecilia's Cakes...mmm!


And surprised me with flowers at work..so sweet :)


Thursday, May 24, 2012

Rosemary Parmesan Artichokes

Ever since I made these steamed artichokes with a cumin lime mayo I can't get enough of artichokes. This time around I decided to go a bit healthier and skip a dipping sauce. I wanted the herbs to bring the flavor to these artichokes, and they did. You could really taste the rosemary.

In the end, I preferred the other artichoke dish more. But I did learn 2 new things this time around.
1.) If you boil the artichokes, it cuts the cooking time in half! It took only 15 mins to cook these artichokes.
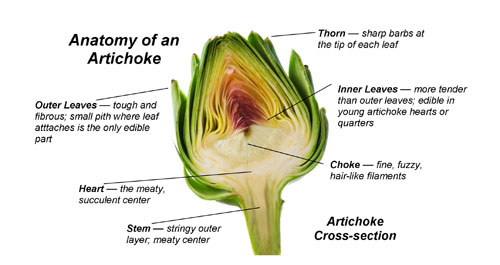
2.) Remove the choke after the artichoke is cooked. It will be much simpler and cleaner. I removed the choke while I was trimming the artichoke, and it was so hard! And the little hairs just kept going everywhere. Never again. So remember, remove the choke from a cooked artichoke! You've been warned...

Rosemary Parmesan Artichokes
 
Ingredients
1 artichoke, trimmed and halved
1 tsp Rosemary, chopped
1/2 tsp thyme, chopped
Garlic powder
Worcestershire sauce
Olive oil
1/4 c Parmesan, shredded

Add water to a large stockpot and bring to a gentle boil. Add the trimmed artichoke and cook for 15 mins. Remove the cooked artichoke and drain cut side down in a colander. In a baking dish, add the drained artichoke. Season it with the Rosemary, thyme, garlic powder, Worcestershire sauce, olive oil, and Parmesan. make sure you get in between the leaves as well. Broil in the oven for about 5-10 mins. (Or grill it, which is what I wanted to do but due to unforeseen weather I had to go to Plan B.)

Wednesday, May 9, 2012

Steamed Artichokes with Cumin Lime Mayo

Artichokes always seem so intimidating in the grocery aisle. How do you cook it or even eat the non-canned kind? It's been on my list of things to learn and with artichokes in season I finally decided to give it a try. And it's actually a lot easier than I thought!

You first need to trim the artichoke. Cut off the top of the artichoke with a serrated knife (about an inch off the top). Then peel off the 2 bottom layers of leaves around the stem. Next, take a pair of scissors and cut of the spiny tip on the remaining leaves (about 1/4-1/2 an inch off the leave's tips). Then, using a vegetable peeler, peel the outer layer of the stem. There, now you have a trimmed artichoke! If you have more artichokes to work on trimming, keep the already trimmed artichoke in cold water with the juice of a lemon, until ready to cook.

For my first artichoke dish, I kept it simple by steaming the artichoke. In a stockpot, I simmered a couple of inches of water. Then placed a steamer basket on top. Place the trimmed artichokes in the steamer basket and cover with a lid. Cook over medium heat for 45 mins. You can stick a knife in the center and if it comes out clean it's done cooking. I made a cumin lime mayo for dipping. Mix 1/2 c mayo, 1 minced garlic clove, 1 tsp cumin, 1/2 tsp Worcestershire sauce, the juice of 1/2 a lime, and some salt and pepper to taste. Keep it in the fridge until ready to serve.

To eat the artichoke, pull off the outer leaves and scrape off the meat with your teeth. When you get to the center, that's the artichoke heart. There's a spiny, inedible "choke" in the center of the heart. Use a small spoon to remove the choke. (The choke is the very hairy thing if you're still unsure.) With the remaining artichoke heart, just chop it up and eat it. If the stem is intact you can eat that as well. Basically everything in the artichoke is edible except the spiny choke. Really, easier to prepare and eat than it looks!

Steamed Artichokes with Cumin Lime Mayo

Ingredients
2 artichokes, trimmed
1/2 c mayo
1 garlic clove, minced
1 tsp cumin
1/2 tsp Worcestershire sauce
1/2 lime, juiced
salt and pepper to taste

Simmer a couple of inches of water in a large stockpot, over medium heat. Place a steamer basket on top. (You don't want the bottom of the steamer basket touching the water.) Place the trimmed artichokes in the steamer basket, cover with a lid. Cook for 45 mins. While the artichokes are cooking, prepare the cumin lime mayo. Mix the mayo, garlic, cumin, Worcestershire sauce, lime juice, salt and pepper together and keep in the fridge until ready to serve. When the artichokes are ready for eating, serve with the cumin lime mayo as the dipping sauce.

Sunday, April 15, 2012

Corn and Poblano Salad


Matt makes a chorizo and potato taco topped with this creamed corn and poblano mixture that is amazing. For a cookout we were going to, I wanted to make something similar. Instead of using mexican crema like Matt's version, I decided to use queso fresco so it'd be easier to eat as a side dish. We've recently discovered queso fresco. It's a really light cheese - kinda like a Mexican feta cheese.  I love it. I kept picking at it while making this dish (guilty).  But it's great for crumbling, like in this dish, not so much for melting.
This side dish is sweet from the corn and spicy from the poblano peppers. The paprika and cumin added a touch of smokiness to the dish. And yes, I used 24 oz of queso fresco, but all the cheese helps mellow out the spiciness. This dish would be great topped on a taco as well.

Corn and Poblano Salad

Ingredients
3 ears yellow corn, kernels removed
3 poblano peppers
1 onion, diced
24 oz queso fresco
1 tsp smoked paprika
1/2 tsp cumin
1 tsp salt
1/2 tsp pepper
2-3 tbsp olive oil

First, roast the poblano peppers on the grill until charred on all sides. Then place in a bag to steam for 10 mins. Remove from the bag and using a knife, scrape off the charred skin. Remove the stem and seeds from the poblano peppers. Slice the peppers into strips and then dice. 

In a deep medium skillet, heat about 2-3 tbsp of olive oil over medium heat. Add the diced onions and cook for about 5 mins until translucent. Then add the corn and cook for about 3 mins. Then add the diced poblano peppers, smoked paprika, cumin, salt and pepper and cook for about 1 min.  Remove from the heat and transfer to a large bowl. Crumble half the queso fresco into the salad and mix. Set aside and chill in the fridge. When ready to serve, crumble the rest of the queso fresco into the salad. Enjoy!

Friday, November 18, 2011

Tex-Mex Salad

If you feel like having Mexican but don't want the heavy burrito, try this salad instead.

After our beach trip and all that delicious fried seafood, we felt like having a lighter meal. But I wanted Mexican too since it had been a while. So to accompany the dip I made below, I paired it with this salad. I tossed some green leaf lettuce, corn, black beans, tomato, and shredded cheddar cheese together. For the dressing I mixed 1 c mayo, 2 tbsp whole-grain mustard, 1 tsp honey, 1 tsp cumin, the juice of 1/2 a lemon, and salt and pepper to taste. Loved the smoky flavor the cumin bought to the dressing. It paired nicely with the sweet corn too. What's great about this dish, besides it not being so heavy, is that it's very filling. I was so full from a serving of the salad and dip. I guess it was all those beans!

Wednesday, September 28, 2011

Sweet Mustard Dressing

I loooved this salad! The dressing was a little sweet, a little tangy. Toss it with some green leaf lettuce, tomatoes, red onion, bacon, croutons, and cheese. The dressing paired perfectly with all these toppings!

Sweet Mustard Dressing

1 c mayo
2 tbsp whole-grain mustard
6 tsp maple syrup
1/2 a lemon, juiced
salt and pepper to taste

Whisk all ingredients together.

Thursday, August 18, 2011

Glazed Carrots


Picture of Glazed Carrots Recipe
Glazed Carrots
So I am lucky to have a husband who not only helps clean around the house but also likes to cook for me. He usually likes to cook one or two meals a wk. This week he made these glazed carrots from Alton Brown's Good Eats Volume II cookbook. At first I wasn't sure about it. The ingredients included ginger ale and chili powder. But man did it turn out to be the best carrots we've ever had. We usually don't like carrots or care to cook them either, but these carrots might become a regular in our meals now.

Ingredients

  • 1 pound carrots, approximately 7 medium, peeled and cut on the bias 1/4-inch thick
  • 1 ounce (2 tablespoons) unsalted butter
  • Heavy pinch kosher salt
  • 1 cup good-quality ginger ale
  • 1/2 teaspoon chili powder
  • 1 tablespoon chopped fresh parsley leaves

Directions

In a 12-inch saute pan over medium heat, combine the carrots, butter, salt and ginger ale. Cover and bring to a simmer. Once simmering, remove the lid, stir, and reduce the heat to low. Cover again and cook for 5 minutes. Remove the lid, add the chili powder and increase the heat to high. Cook, tossing occasionally, until the ginger ale is reduced to a glaze, approximately 4 to 5 minutes. Pour into a serving dish and sprinkle with the parsley. Serve immediately.

Wednesday, April 27, 2011

Rosemary Honey Vinaigrette

I was in the mood for a simple mixed green salad with an oil and vinegar dressing. Instead of using vinegar, I decided to use the lemon we had in the fruit bowl. But then I got to thinking, oil and vinegar - sounds so boring and not mouth-watering at all. I wanted to add more flavor to the healthy option. Then I remembered my herb garden that I just started growing. When I saw the rosemary I thought that would be different and interesting. I decided to cut a sprig and try it. Rosemary can be overbearing so I wanted to balance it out with something. What better to pair it with than some honey from the farmer's market. This dressing turned out amazing! There was so much flavor and the honey and rosemary worked so well together. I hope you try this quick and healthy twist and enjoy it as much as I did!

Rosemary Honey Vinaigrette
1 sprig of rosemary finely chopped
Juice of 1 lemon
1 tbsp of honey
1/4 to 1/2 c of olive oil
 salt to taste

Whisk first 3 ingredients together. When well mixed, slowly whisk in 1/4 cup of the olive oil, adding more as needed. Add salt to your liking. Enjoy!